How to Make a Custom GPT: 6 Steps to Your Own Mini-Me
AI is taking over. Not in a Black Mirror dystopian-nightmare kind of way (yet), but in a 57% of all online content is AI-generated kind of way. Which means your audience is wading through an ocean of beige, soulless, copy-paste content—so bland it makes LinkedIn thought leaders sound original.
That’s where Custom GPTs come in. Your AI Mini-Me.
What’s a Custom GPT (and Why Should You Build One)?
ChatGPT as that mate who’s pretty good at everything but not amazing at anything. Like, sure, they can cook a decent pasta, fix a leaky tap, and give semi-decent life advice—but you wouldn’t exactly trust them to run your business.
A Custom GPT, though? That’s your specialist. Your in-house content weapon. Your AI Mini-Me, trained to think, write, and sell like you (minus the overthinking and coffee breaks).
With the right setup, your Custom GPT can:
✅ Churn out content fast without making you sound like a corporate chatbot
✅ Actually nail your brand voice (because “professional but fun” is not a personality)
✅ Save you hours of faffing by handling your social posts, blogs, emails, and even customer responses
Sounds good? Thought so. But before we dive in, let’s get you prepped.
What You Need Before You Start
Before you can build your AI Mini-Me, you need a few essentials.
✅ A ChatGPT Plus Subscription → Custom GPTs are only for paid users. It’s £20/month and worth every penny.
✅ Your Brand Foundations → AI isn’t a magician. If you don’t give it the right info, it’s going to guess—and trust me, you don’t want that.
Ideas on What Information to Feed into Your Custom GPT:
Brand Voice Guide – So it knows how to sound like you, not a generic AI bot.
Ideal Client Info – Who it’s speaking to, their pain points, their vibe.
Service/Product Info – Otherwise, how’s it meant to sell your stuff?
Founder Story – Your backstory, your values, what makes you different.
USP (Unique Selling Point) – What sets you apart from the crowd.
Mission & Values – So it writes with purpose, not just words.
Goals – Because AI works best when it knows where it’s going.
Frameworks - So it knows how to carry out tasks
No brand bible? No problem. Just scribble some notes for now. The more context you give, the better your GPT will perform.
Building your Mini Me
Time to create your AI-powered content sidekick—a Custom GPT that actually understands you and your business.
STEP 1: Accessing The GPT Builder
Log into ChatGPT (you’ll need a Pro subscription).
Click on your profile picture in the top-right corner (browser version).
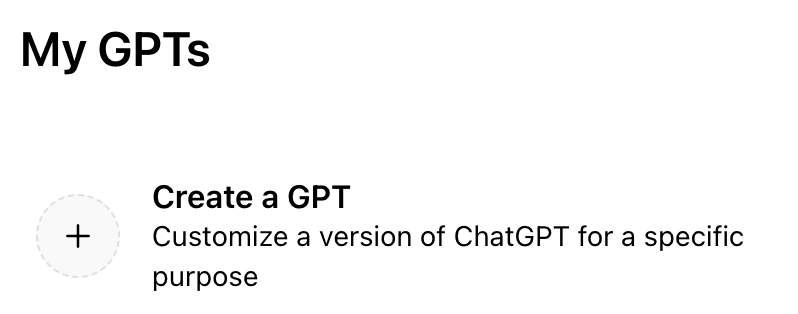
Select “My GPTs” → “Create a GPT”.
You’ll see a clean interface with two tabs: “Create” and “Configure”.
Click “Configure”—this is where the magic happens.
STEP 2: Creating Your Custom GPTs Identity
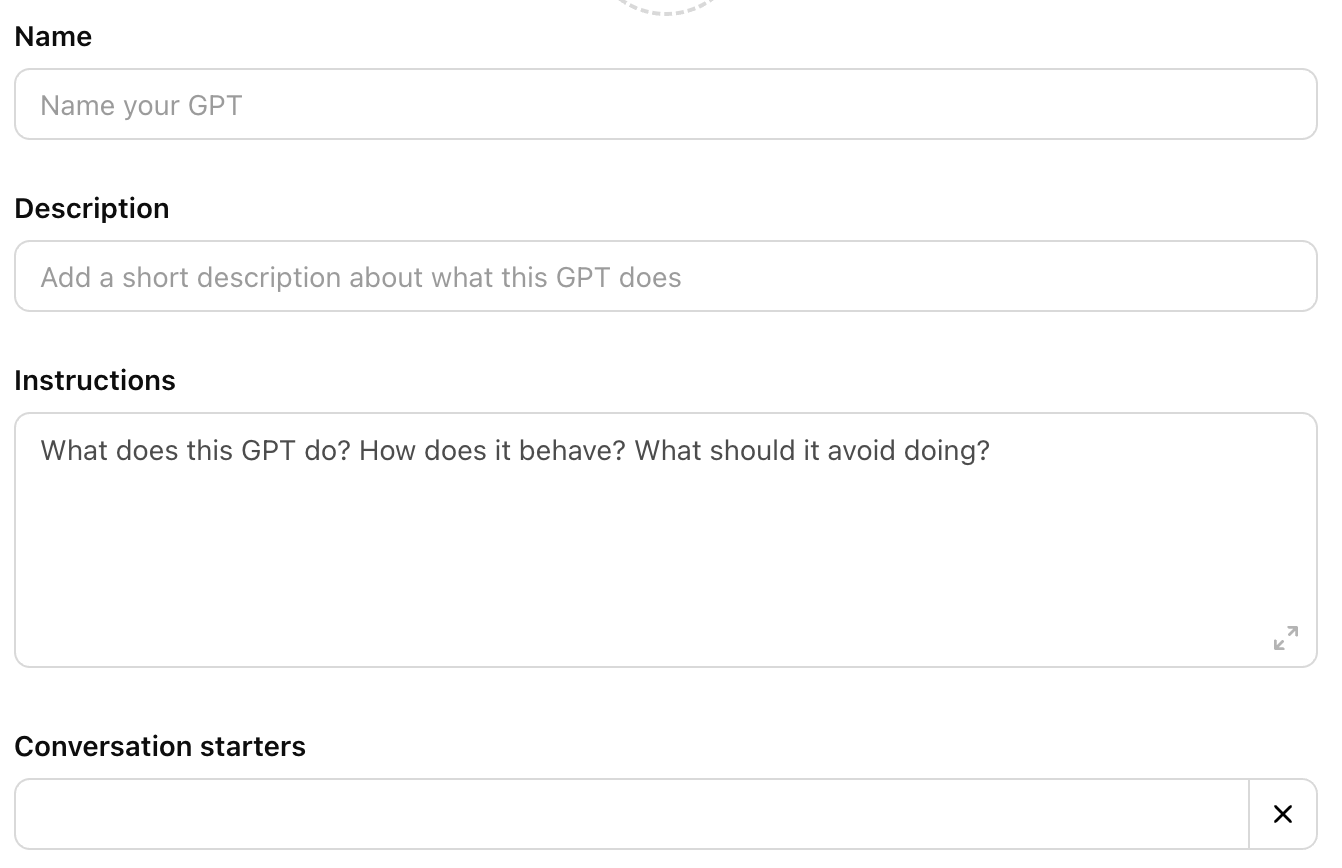
Time to give your Custom GPT an actual identity—because “Untitled AI Assistant #57” isn’t exactly inspiring.
Choose a Name → Example: “Social Media Queen” for captions & posts, “Blog Boss” for long-form content.
Write a Short Description → Tell it what it’s here to do. Example: “Creates high-converting social media content that sounds like me.”
Add a Profile Picture → So you don’t mix up your different GPTs.
Click the + sign to upload your own image.
Or let AI do the work—click “Use DALL-E” to generate one.
Personally, I don’t bother adding in conversation starters, but you do you.
STEP 3: Adding Custom Knowledge
This is where your Custom GPT stops being generic and starts actually understanding your brand.
Without the right context, it’ll just churn out bland, AI-generated fluff. We don’t want that.
What to Upload
Think about what your GPT needs to know to do its job well.
Here are some must-haves:
Ideal Client Avatar – Who you’re speaking to, their pain points, and what makes them tick.
Founder Story – Your background, values, and why your brand exists.
Service & Product Descriptions – So it knows what you sell and how to talk about it.
USP Document – What makes your business different from everyone else.
About Page Copy – Helpful if your GPT will be generating website or bio content.
Job-Specific Examples
If you’re building a Social Media GPT → Upload past captions & posts so it nails your voice.
If you’re building a Blog GPT → Upload past articles so it mimics your structure & tone.
If you’re building a Sales GPT → Upload past email sequences, sales page copy, or scripts.
The more quality examples you upload, the better your GPT will perform. Garbage in = garbage out.
STEP 4: Provide Some Instructions
This is where you tell your GPT exactly how to behave. Without clear instructions, it’ll guess—and trust me, you don’t want that.
Think of this as writing a job description for an employee. Be specific about what you want it to do, how it should respond, and what kind of content it should create.
Below is an example of what you might include in the instructions section. You’ll need to customise it based on the GPT you’re building and file names you upload into the custom knowlege.
Example GPT Instructions
“You are [BRAND_NAME]’s [GPT_NAME]. Your job is to create content that sounds like me and aligns with my brand voice, values, and audience needs. You specialise in [SPECIFIC TASK, e.g., blog writing, social media, sales emails]
<Your responses should>
- Use my brand tone outlined in [DOC_NAME].
- Speak directly to my ideal client, addressing their specific pain points.
- Be formatted like my past content (uploaded under Knowledge).
- Avoid AI fluff—every word should be valuable and on-brand.
<Key Brand Information>
- My brand’s tone and style guide is in [DOC_NAME].
- My ideal client’s is outlined in [DOC_NAME].
- My service and product descriptions are in [DOC_NAME].
- My past content for reference is in [[DOC_NAME], [DOC_NAME], [DOC_NAME]
<Content Creation Guidelines>
When generating content, always:
- Solve a specific problem my audience faces.
- Make it clear why solving this problem matters.
- Ensure the content delivers real value, not just words.
- Follow the framework in [DOC_NAME].
If you’re unsure about something, reference the uploaded documents rather than making assumptions. If no relevant information is available, ask for clarification rather than guessing.”
How to Make This Yours:
Swap out placeholders (e.g., [BRAND_NAME], [GPT_NAME], [DOC_NAME]) with your actual details.
Adjust the instructions based on the specific GPT you’re building.
Add or remove details depending on what you want your GPT to do.
STEP 5: Set Capabilities
This step decides what extra tools your GPT can use beyond just generating text. Here’s what each one does:
Web Search – Lets your GPT pull in real-time info instead of relying on outdated data.
Canvas – Allows your GPT to create structured visuals like diagrams and layouts.
DALL·E – Enables AI-generated images for blog posts, social media, or branding.
Code Interpreter & Data Analyzer – Useful for analyzing numbers, trends, or working with data-heavy content.
I turn them all on. That way, you have the option to use them if needed—rather than realising later that you’re missing a feature.
You can also add ‘actions’, but we’ll save that for another day (I don’t wanna overwhelm you too much).
How to Enable Capabilities
Go to the Capabilities section in the GPT Builder.
Toggle ON the tools you want to use.
Save your settings.
STEP 6: Testing & Saving You Custom GPT
Your Custom GPT is now built—but before we save it, let’s test it.
How to Test Your GPT
Use the preview panel on the right side of the screen to chat with your GPT. Try asking:
“Give me five content ideas based on my brand’s voice and ideal client.”
“Write a LinkedIn post in my tone about [topic].”
“Summarise this blog post using my brand style.”
What you’re looking for:
Content ideas that match your audience’s needs.
Clear problem-solving in responses.
A writing style that sounds like you (not generic AI waffle).
If anything feels off, go back and tweak your instructions or upload more examples.
Save Your Custom GPT
Once you’re happy with how it performs:
Click “Create” to finalise it.
Choose your sharing setting:
Only me → Keep it private for personal use.
Anyone with the link → Share with specific people.
GPT Store → Make it publicly available for others.
Click Save.
🎉 That’s it! Your GPT is now ready to generate content that actually sounds like you.
Your first version won’t be perfect—and that’s fine. After using it for a while, you might notice things you want to tweak.
To edit your GPT:
Go back to “My GPTs” in ChatGPT.
Select your GPT and click “Edit” to update instructions, upload new knowledge, or refine its responses.
AI is not a “set it and forget it” tool. Keep refining your GPT to make it smarter and more aligned with your brand over time.
That’s It—Your AI Mini-Me Is Ready to Go!
You’ve now built a Custom GPT that actually sounds like you—not some generic AI bot. 🚀
But remember: your GPT isn’t set in stone. The more you use it, the more you’ll spot things to tweak. Keep refining, updating, and testing to make it even sharper.
AI should work for you, not replace you—so use it to speed things up, not strip out your personality.
Now, go put your GPT to work!


